Personal Projects

Houdini Debris Placement

Houdini Crystal Creation

Lootbox VFX
Game Projects

P5 - SPITE: Ashes of Ephtael

P6 - Maruk: Shipwrecked

Important to note: I am part of The Game Assembly’s internship program. As per the agreement between the Games Industry and The Game Assembly, neither student nor company may be in contact with one another regarding internships before April 15th. Any internship offers can be made on April 27th, at the earliest.
Want to get in touch with me?
Important to note: I am part of The Game Assembly’s internship program. As per the agreement between the Games Industry and The Game Assembly, neither student nor company may be in contact with one another regarding internships before April 15th. Any internship offers can be made on April 27th, at the earliest.
Want to download my resume as a PDF? Click the button below!
Important to note: I am part of The Game Assembly’s internship program. As per the agreement between the Games Industry and The Game Assembly, neither student nor company may be in contact with one another regarding internships before April 15th. Any internship offers can be made on April 27th, at the earliest.
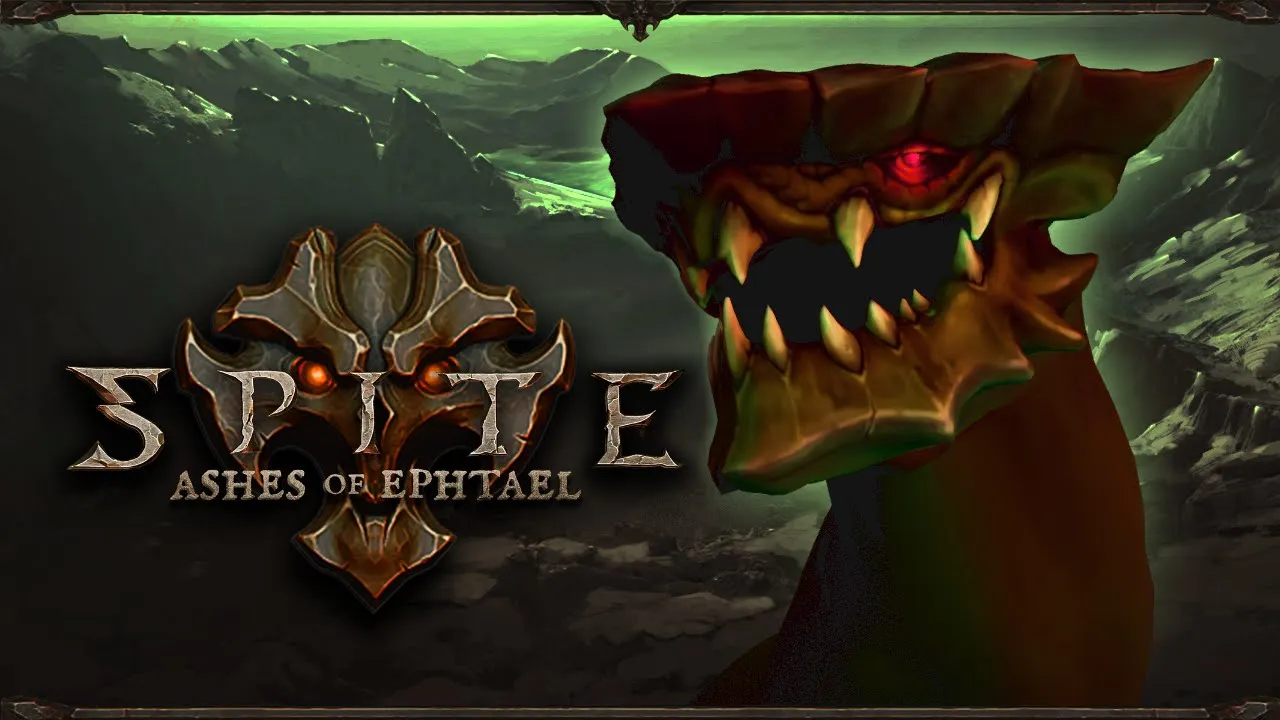
"As Cinder, crusader of the Torch-Bearers, venture into the corrupted swamp, Epthael. Blaze a path through the foul creatures of the swamp to reclaim it from Pythos' grasp, as you, and your faith, grow stronger."
This project is also referred to as P5 at TGA, a project utilizing Blizzard Entertainment's Diablo 3 as the reference game and Heroes of the Storm as the art-reference.
My Contribution
For this project I worked mostly on the particles for the characters abilities.
My main goal for the effects was creating:- Satisfying combat,- Rewarding impact,- Effects that match the amount of damage the abilities deal,- A uniform look that ties the abilities together.


If you would like to try SPITE: Ashes of Ephtael, it is avaliable on Itch.io here.
Important to note: I am part of The Game Assembly’s internship program. As per the agreement between the Games Industry and The Game Assembly, neither student nor company may be in contact with one another regarding internships before April 15th. Any internship offers can be made on April 27th, at the earliest.
Maruk: Shipwrecked is a story about a drunken pirate-frog, washed ashore after a particularly nasty storm.He finds a scull in the sand, awakening the spirit of a past captain, Cpt. Needy McGreedy. McGreedy promises Maruk he will help him home if Maruk finds McGreedy's treasure. To help on the journey the Captain grants Maruk spirit powers inspired by the Dweller Mask from the game: A Hat in Time.
Also referred to as P6 at The Game Assembly, this game is a third-person game where our group got to choose the story, themes and references ourselves.We additionally chose Caravan Sandwitch as our art-reference, wanting to focus on iteration over massive quantity of assets and features.


My Contribution
For the environmental effects I made for this project, I worked closely with my fellow Technical Artist Markus Norén and our Graphics Programmer Jonas Anders. Together we implemented new functionality into the particle system as well as working on shaders that could work on the particles.
Having a good understanding of our particle system I then used the things we made together to implement it into the game as needed.
I used references from Caravan Sandwitch to get the right feel for the rain as well as the character movement. I then used what I learned from that to make the effects that we didn't have references for, for example the fire we were gonna use for the tiki-torches in the levels.
Working on the movement particles for the player was a bit tricky because I needed to create a shader that randomly picked a blob from a spritesheet for every particle that was spawned.When that was done I colored the particles to make them fit into the environment and then used our visual scripting system to have them triggered and disabled when needed.The same process was repeated for every type of movement needed, jumping, dashing, wallsliding etc., and then adding those into the visual script aswell to ensure they interacted and functioned correctly in relation to eachother.


As well as creating the previously mentioned VFX I also made a tool for our Level Designers and Game Artists that would make it easier to export and import FBXs between our Unreal Engine Project and into our engine.This tool was mostly needed for the creation of ropes that would wrap around the mountains and connecting them to things in the world.The tool consists of a python script that identifies the selected mesh in the Unreal project, it then finds that same file path for our engine and does an FBX export to that filepath.I ran into the problem of the size of the files not exacly matching as well as the meshes crashing our engine instantly upon launching. The solution ended up being a missing collision for the meshes exported with the script. Adding this into the tool fixed the crashing problem.Now I needed the tool to be easy to use. I created a button in the menu that when pressed would run the script and remove a lot of the time-consuming menu-searching and clicking that the users would have to do without the button.

Important to note: I am part of The Game Assembly’s internship program. As per the agreement between the Games Industry and The Game Assembly, neither student nor company may be in contact with one another regarding internships before April 15th. Any internship offers can be made on April 27th, at the earliest.
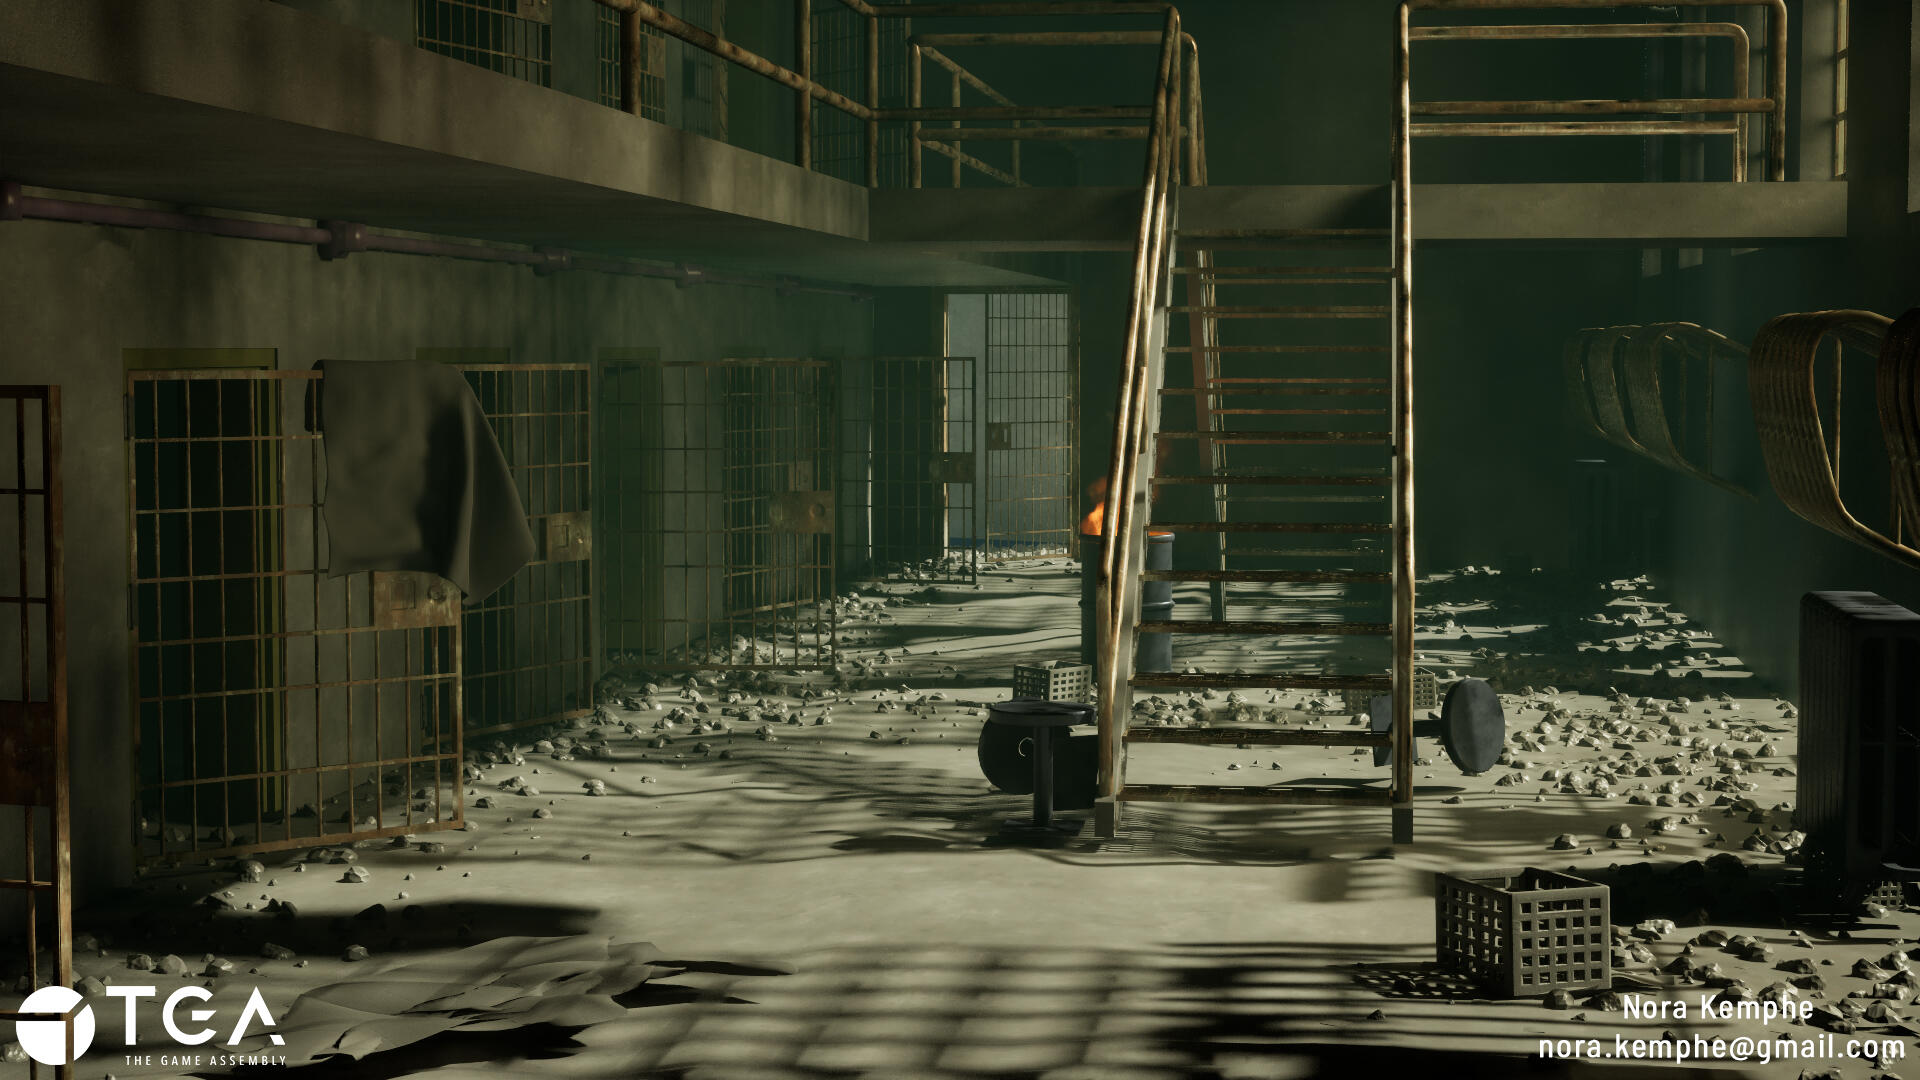
HOUDINI DEBRIS PLACEMENT TOOL
Purpose
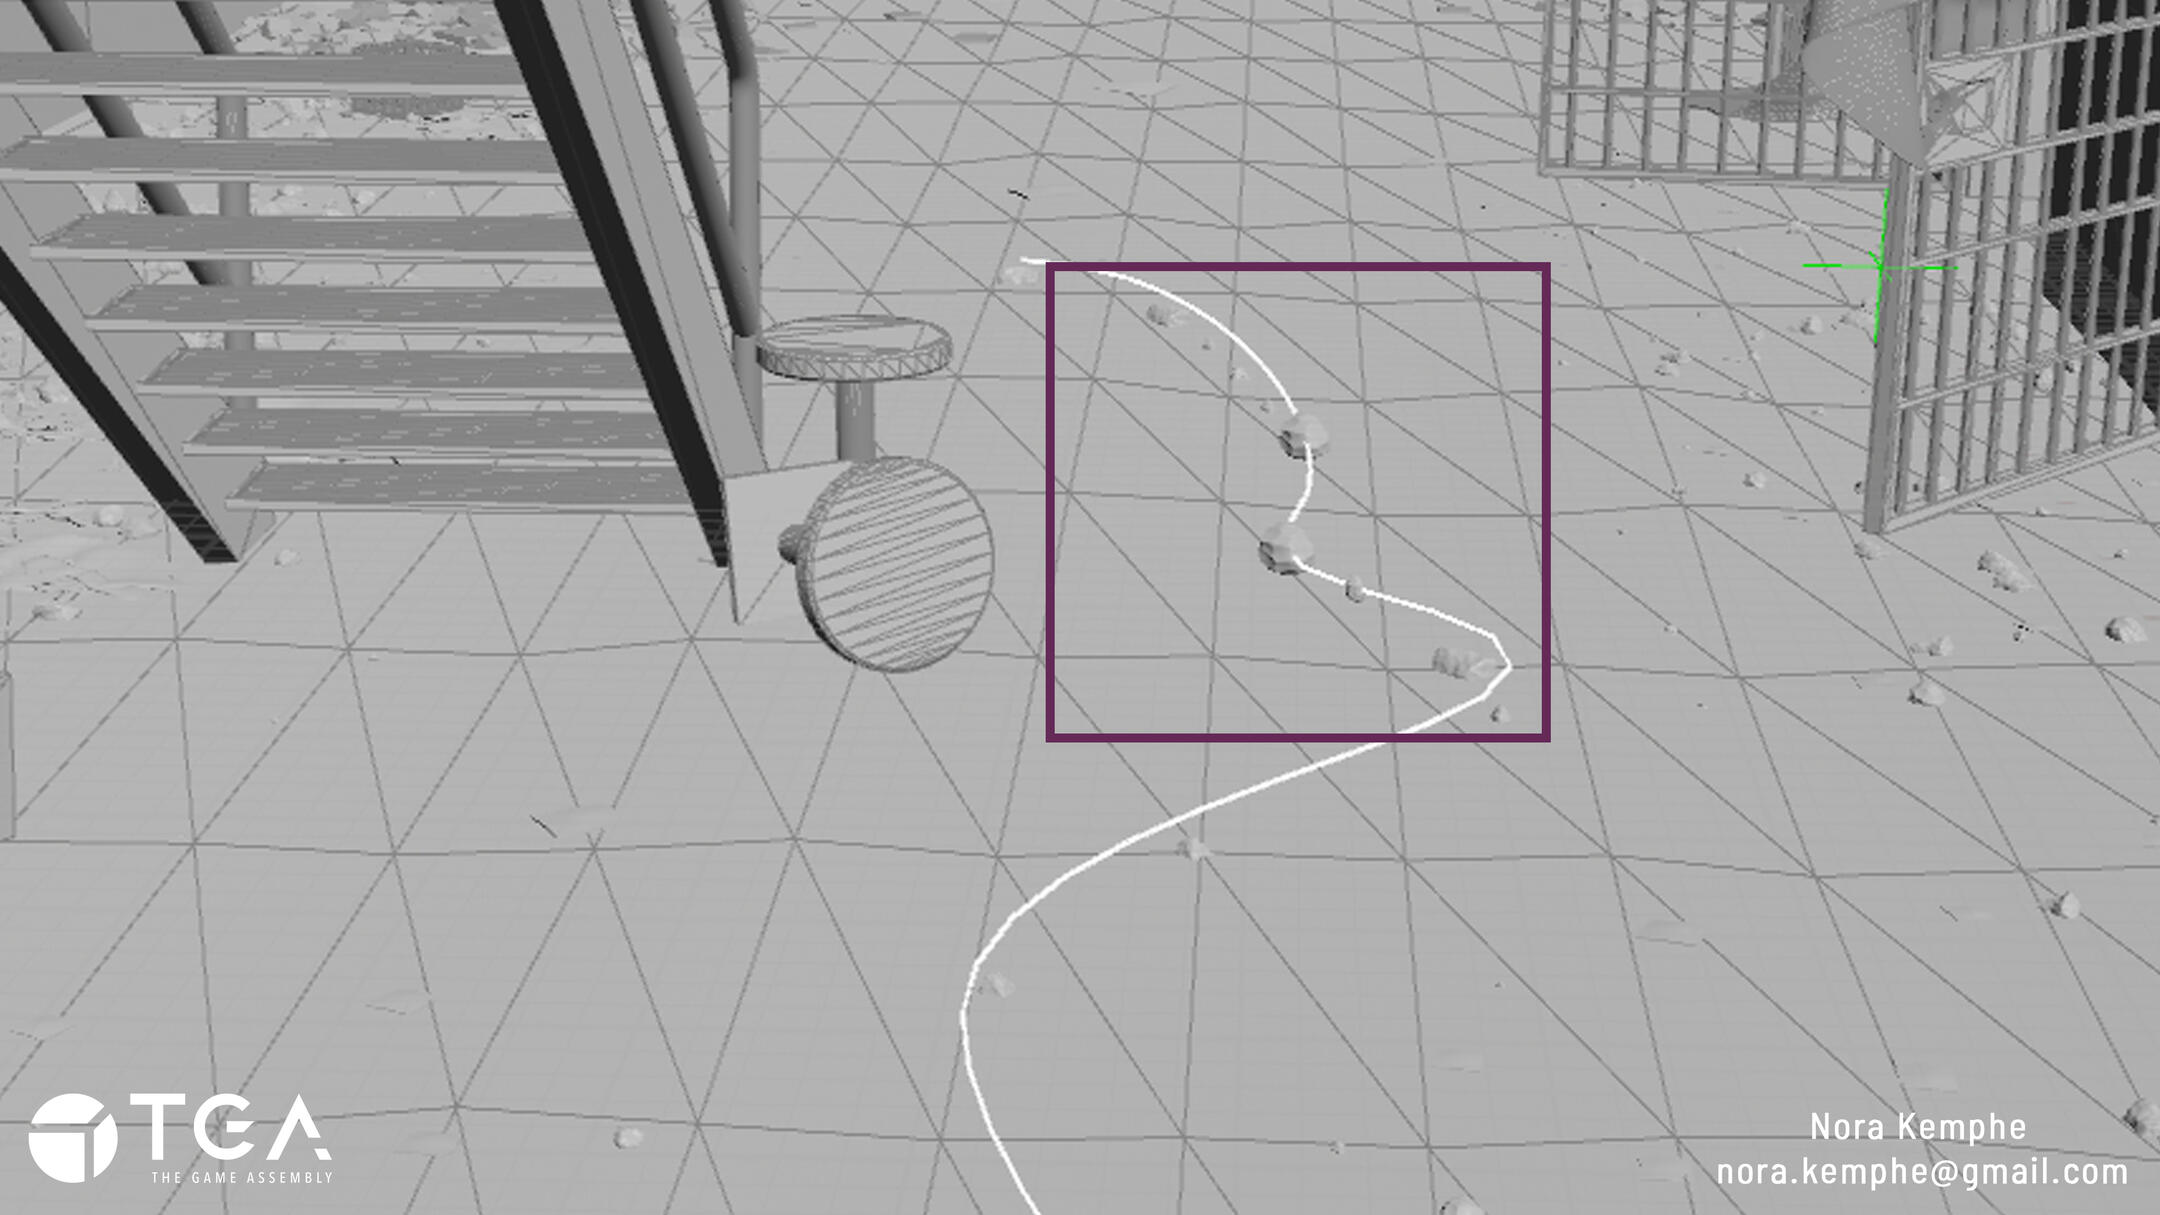
In 2024-2025 I used images and clips from the TV-show The Walking Dead to recreate the prison set they lived in, using Blender. During that time I realized how frustrating it is to try and create the feeling of a lived in, previously abandoned area. For example how debris collects in corners and along walls more than in the middle of the room. I tried using different plugins for blender but none gave me the editability i wanted, which resulted in a lot time being used to move, rescale and remove pieces one by one.When starting the portfolio-course here at TGA I therefore decided to create a tool that allowed me that editability, as well as getting to experiment and learn using Houdini Engine.
The main goals of the project :- Working in Houdini,- Having a logical placement of debris in relation to the scene,- Being able to draw a path/spline through the debris, moving it away from the spline at a determined distance.
Process
This project spanned over 5 weeks with the main focus being to learn to use Houdini and how to implement the tool into Unreal Engine 5.
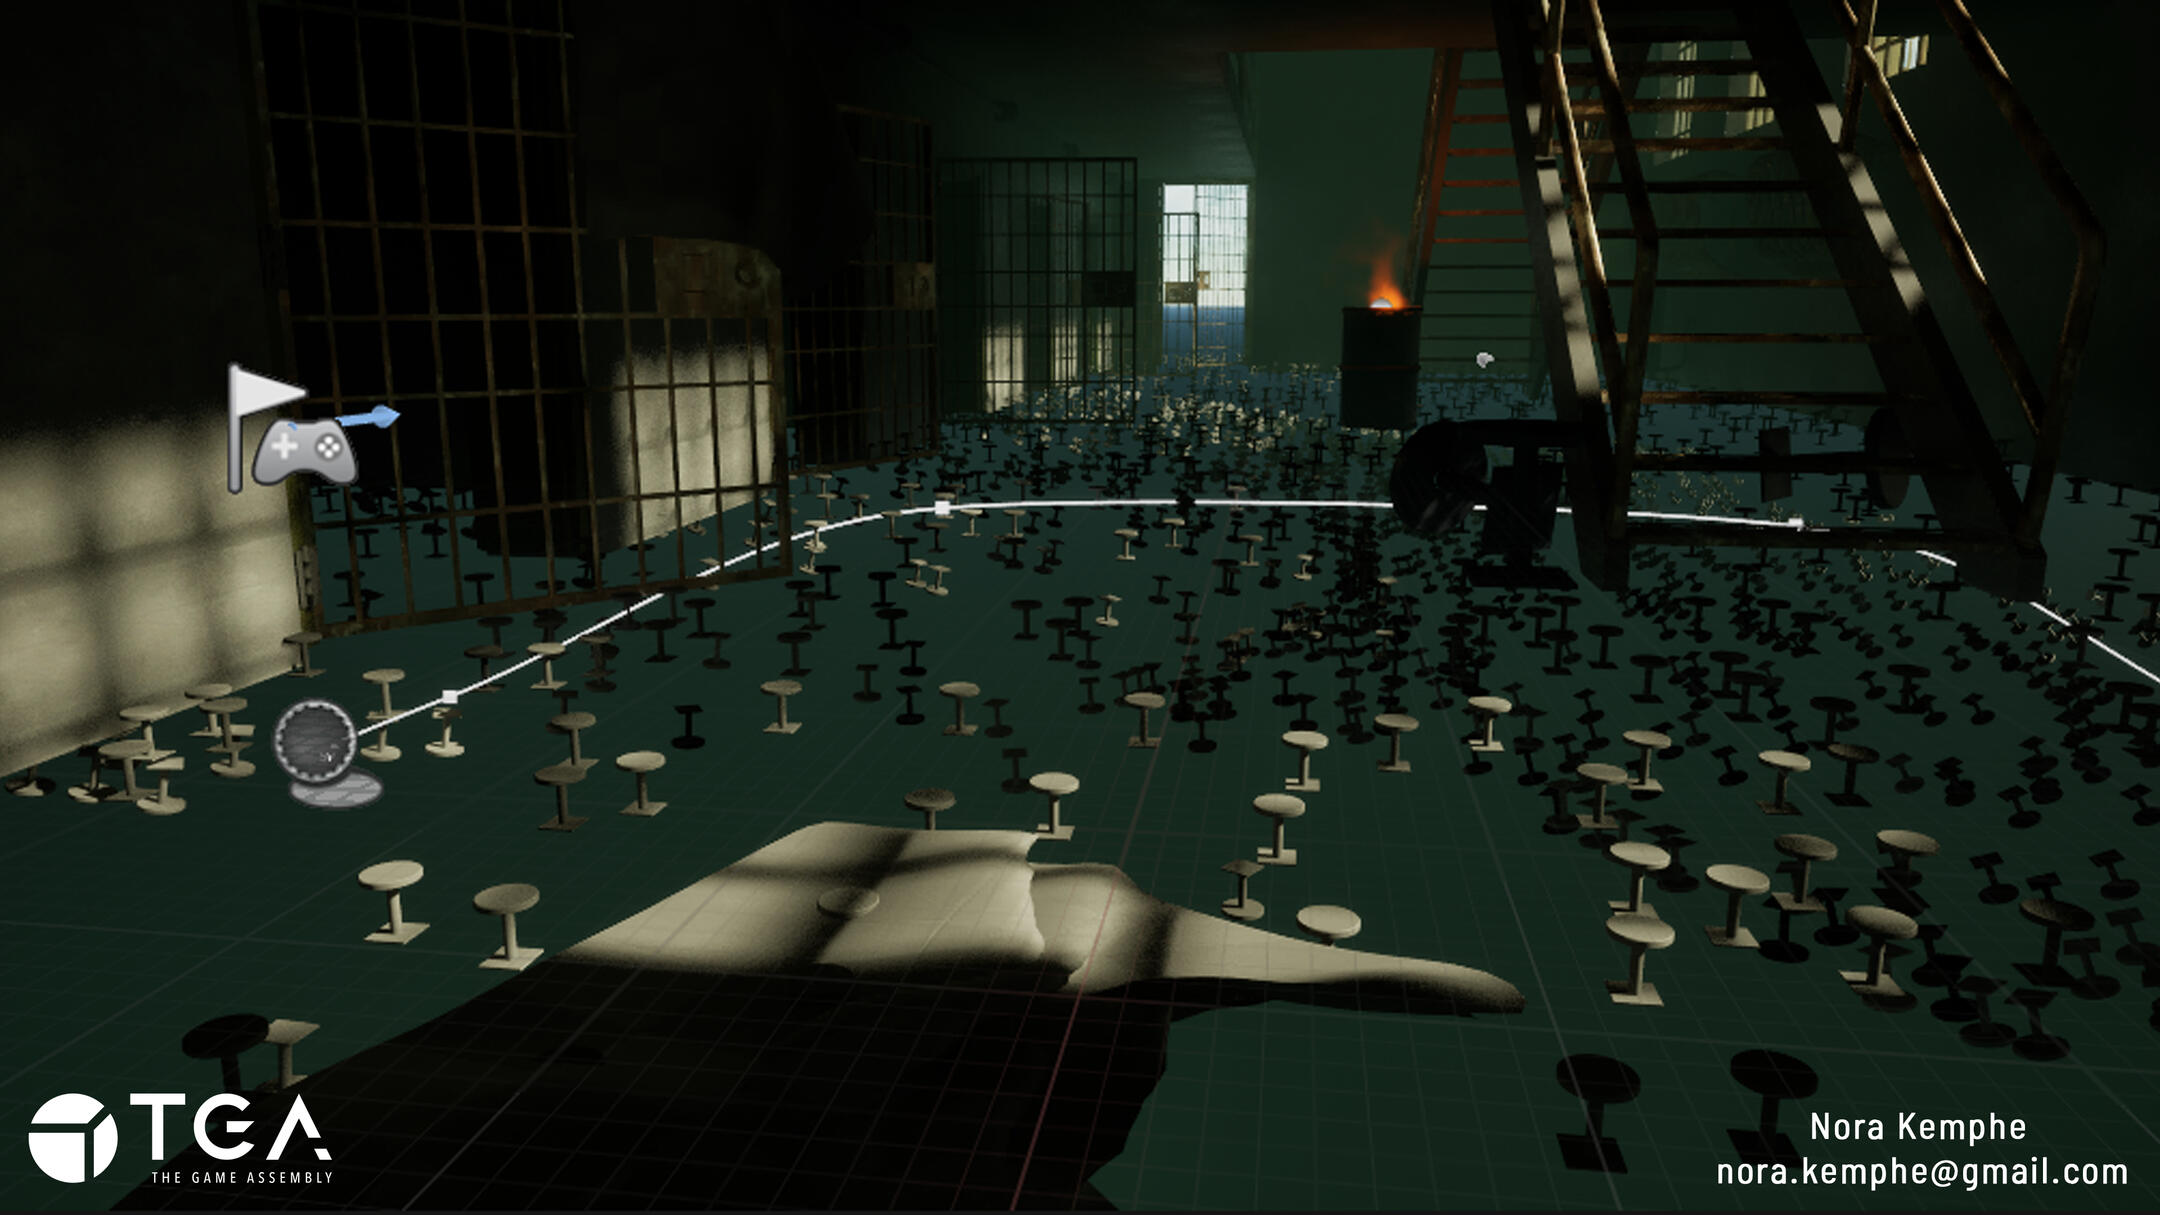
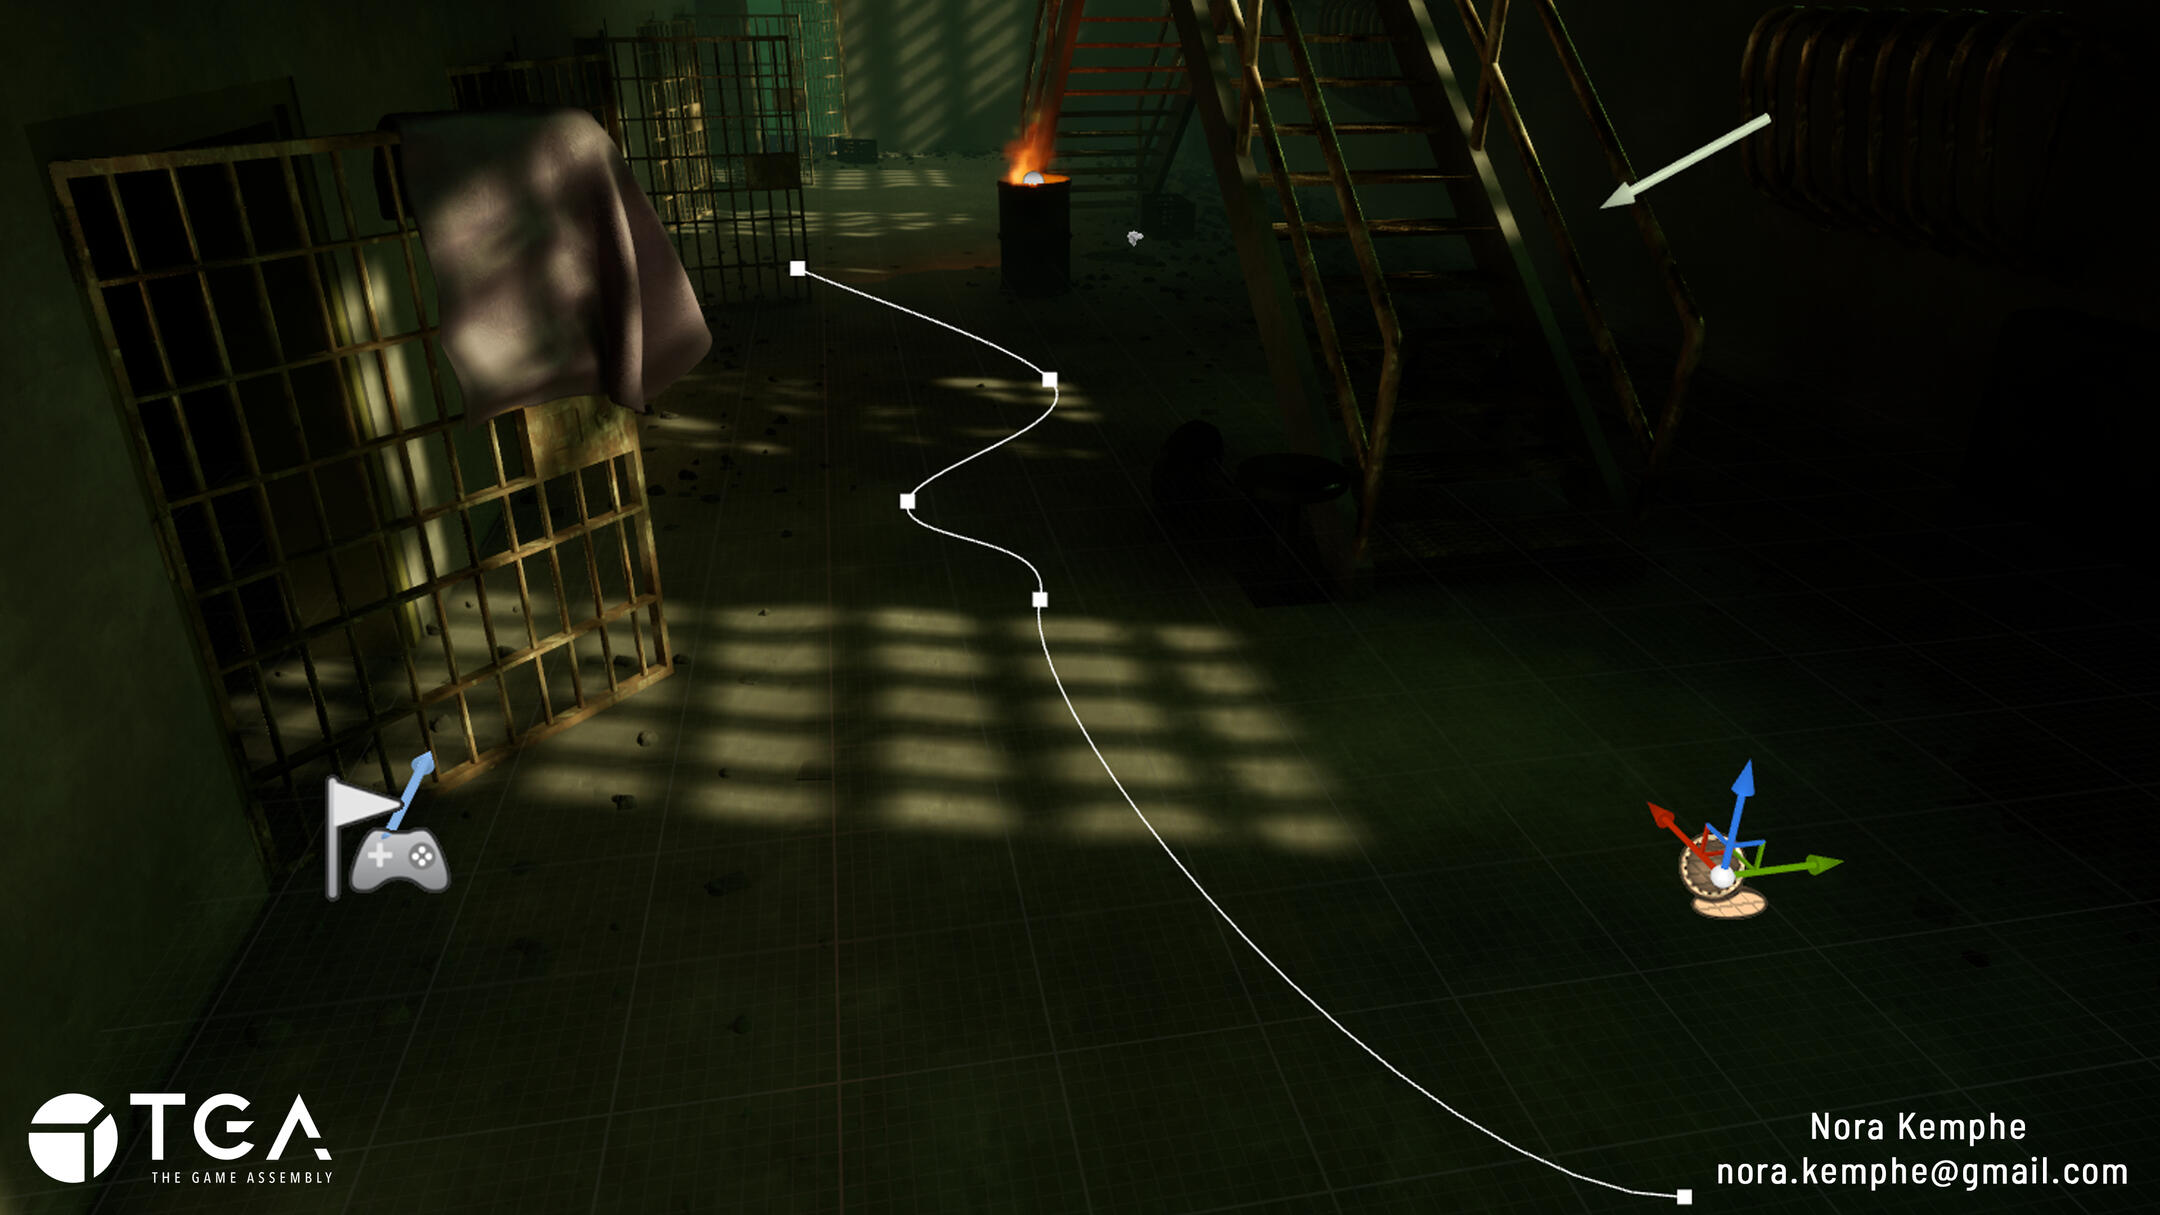
The process started with:Scattering points in a placeholder scene, working out solutions for having multiple types of meshes be inputs for the debris.Testing different ways of controlling the placement of the points, particularly focusing on them avoiding the path.Setting up the scene in Unreal using my pre-existing assets. Having them already made and textured helped speed up the process and gave me more time to iterate on the tool.Lastly, I set up parameters in the digital asset that allowed inputs for the floor, the different debris parts and the spline that would be used to map out the path.
Wanting to be able to control the width of the paths I generated points along the spline and then used their pointclouds to move the debris away.
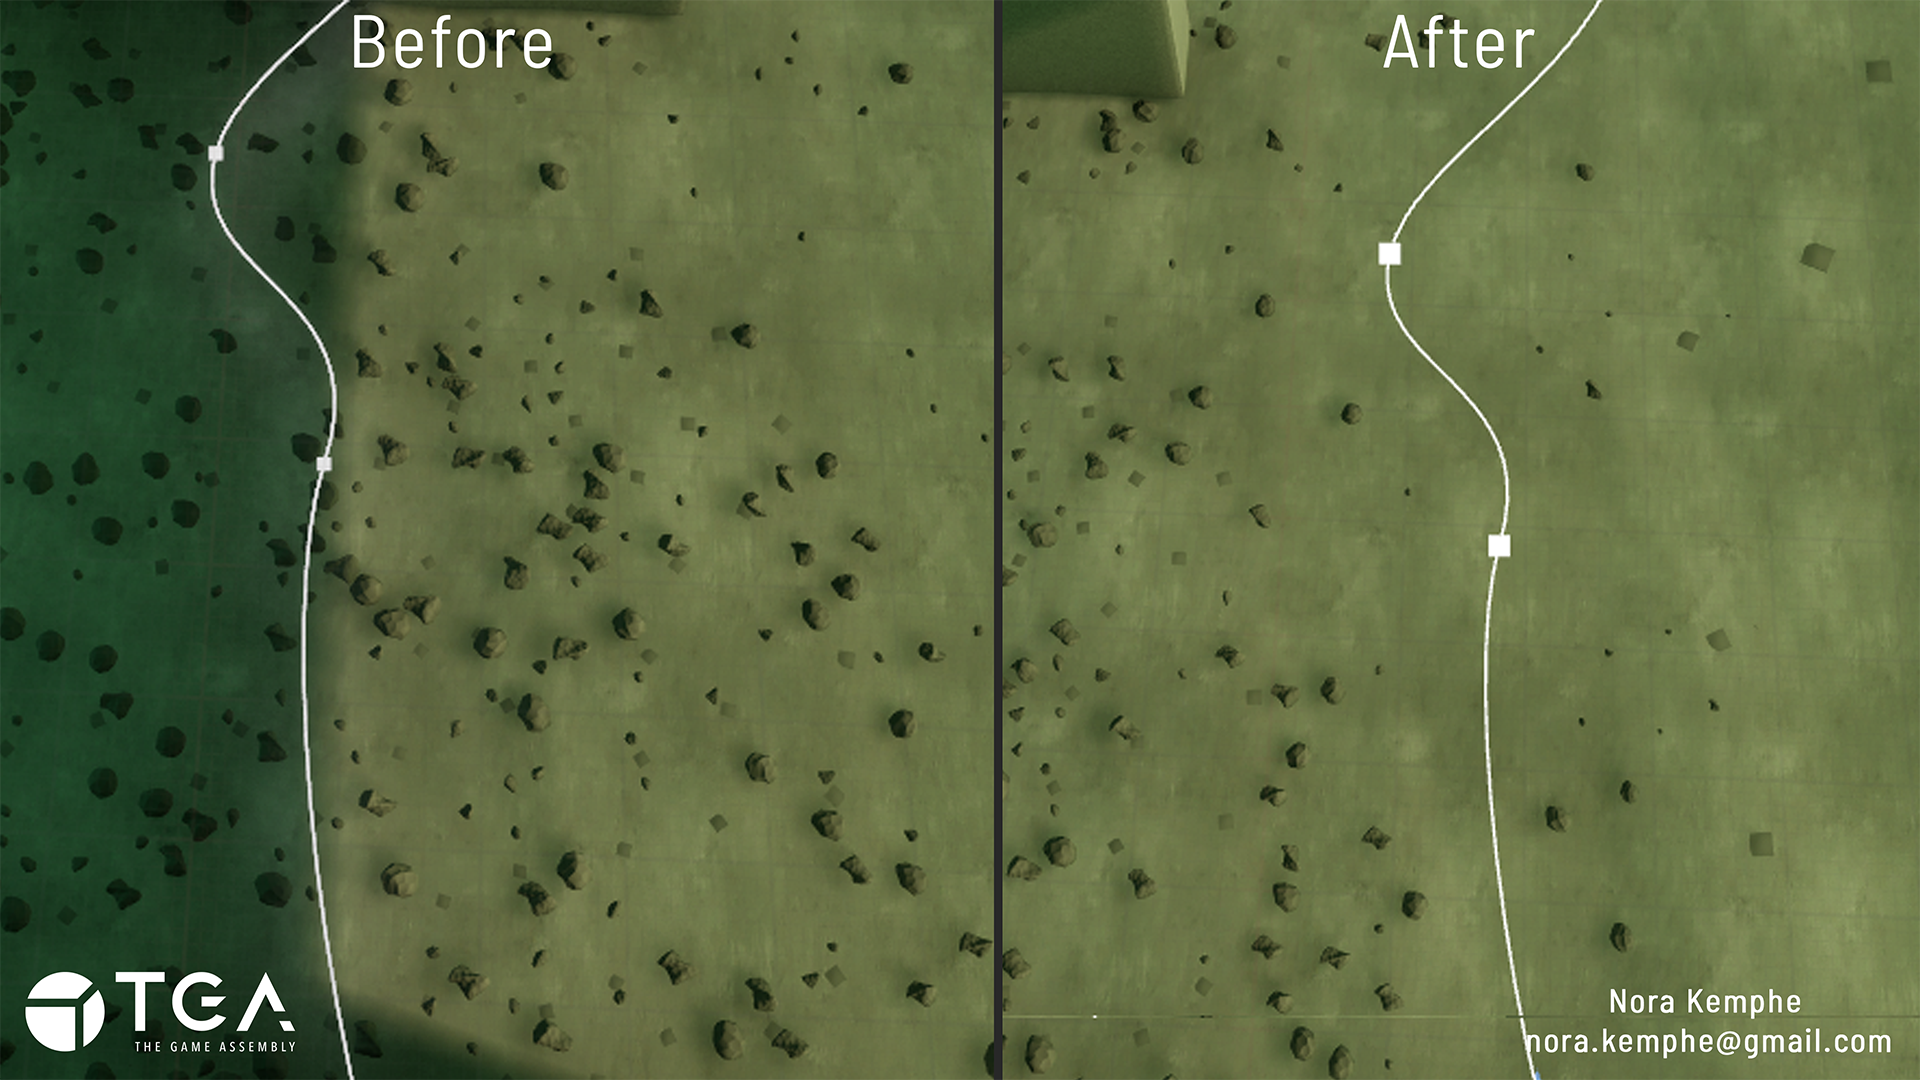
I then went on to solving the problem of wanting more saturated areas of debris along walls and in corners. I solved this by using an Ambient Occlusion mask using the scene, minus the floor, as an input. I then inverted the mask and used it as the area the points would be generated in on the floor.
The last goal for the project was to be able to use an imported FBX with multiple separate meshes as part of the debris inputs.I solved this by having the tool run through each assigned debris mesh, locating those that have multiple separate pieces, and placing them randomly along their respective points.
Problems and Solutions
Being new to using Houdini and implementing it into Unreal I struggled with getting the path to function.
The first problems I had was:- The path only working if the spline in Unreal was perfectly placed on the floor mesh. If it was even slightly above the path stopped working.Solving this was a bit tricky since I didn't know exactly what to look for in Houdini to always have the path be projected onto the ground mesh. After a bit of research I realized that Houdini had a node to cast onto a colliding mesh. This, as well as testing different boudning areas for the collision-data, made it possible for the path to always be cast onto the selected floor mesh.
The second problem I had was:- The spline was generating points that shouldn't be used in the debris placement but somehow were still read by the tool and debris was placed on those points.Going back over my project and looking for the problem took a little time but ultimately the problem I had was that the path points used for the pointclouds (that the debris was to avoid) were added into the rest of the debris points simply by using them in the path-creation.Adding an extra pass over the points, before the debris was copied to the points, where I blasted the specific path points removed them from the debrsi scattering but kept them functional for controlling the path-width.
Important to note: I am part of The Game Assembly’s internship program. As per the agreement between the Games Industry and The Game Assembly, neither student nor company may be in contact with one another regarding internships before April 15th. Any internship offers can be made on April 27th, at the earliest.
HOUDINI CRYSTAL CREATION

Purpose
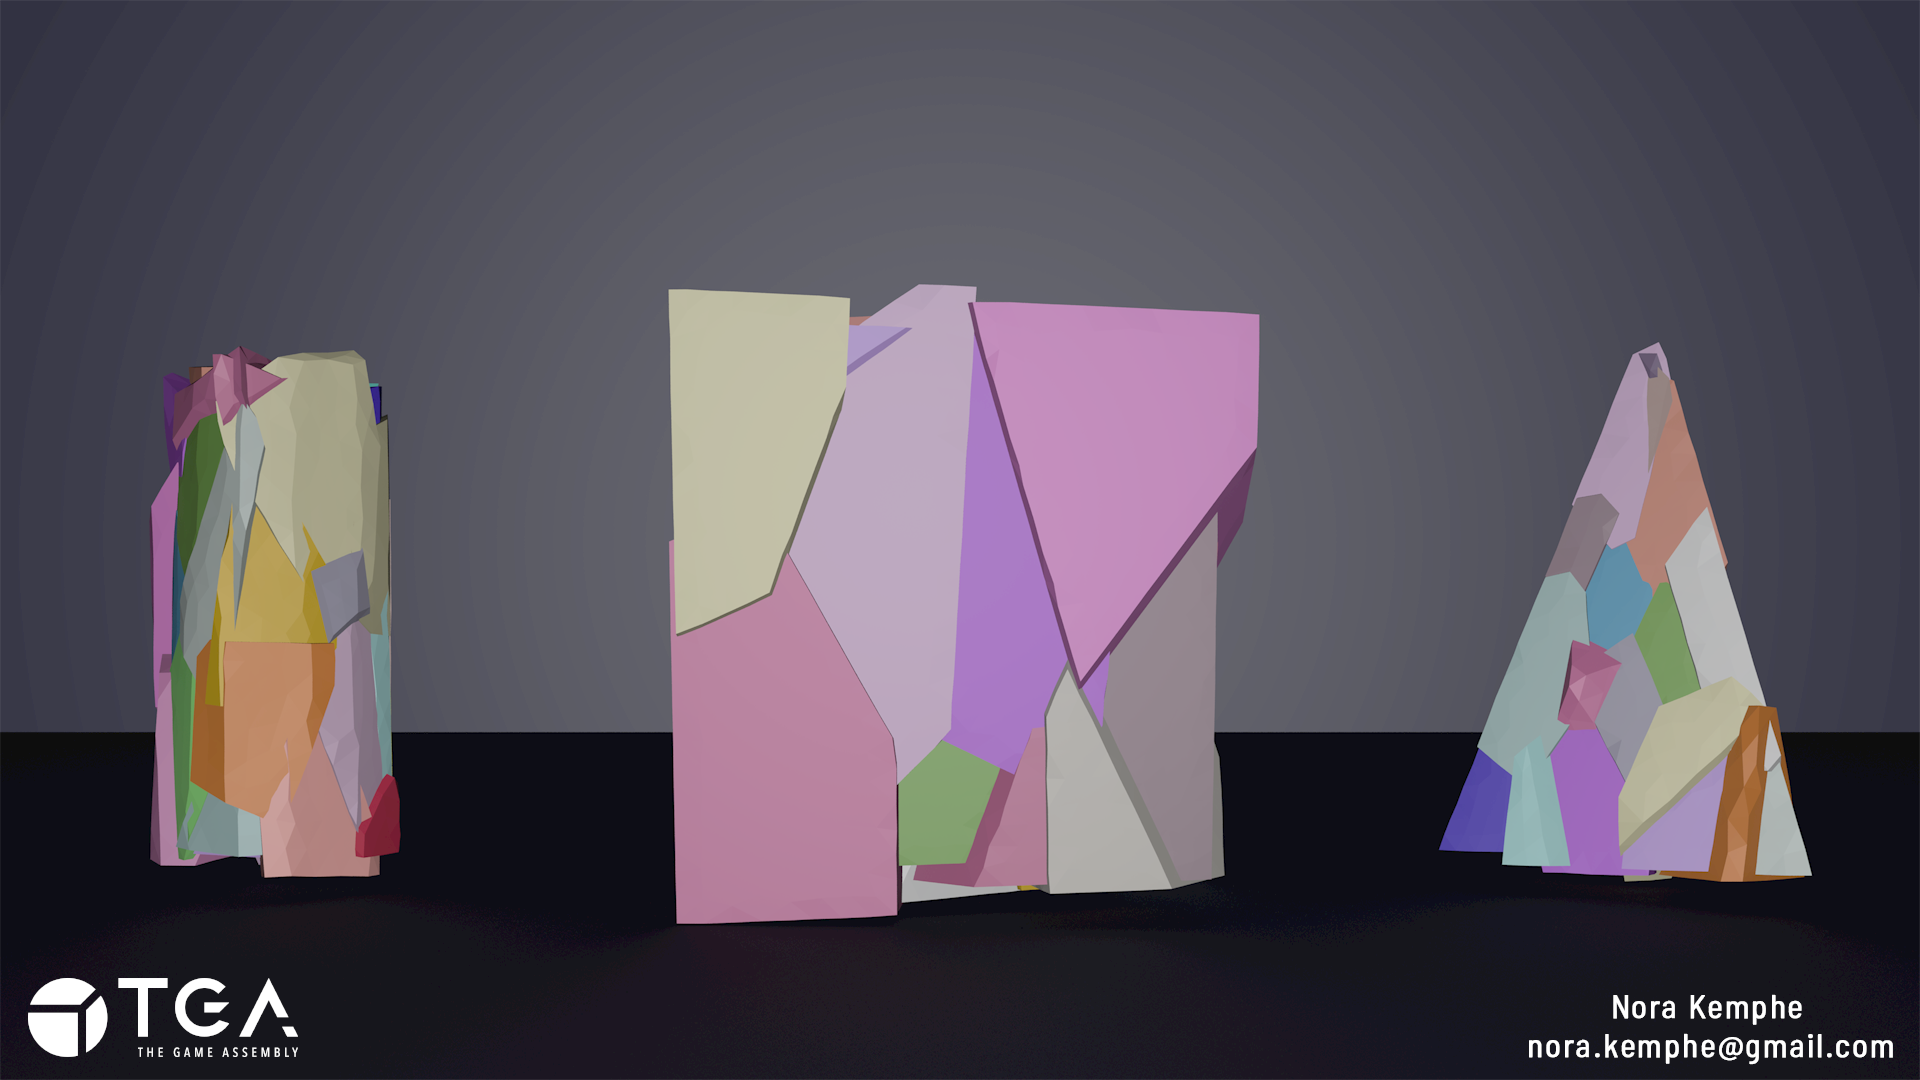
For this project I wanted to create an asset pack for artists or level designers to use to put together caves with crystals using Houdini.
The main points of interest for me being:- Being easy to use,- Creating different types of crystals and clusters,- Creating a scene to showcase and test the process and assets.
I ended up going on a little side quest which resulted in a separate tool for this project centered around creating rocks, that I used for creating the cave itself. For this tool I kept it simple, having a digital asset with three different inputs simply controlling the base shape the rocks were generated from. A cylinder, a cone and a box.
Process
As mentioned I made a separate set of assets not originally planned.I made an input where I could access the different meshes.I shattered the base mesh using points generated in the original shape to set an amount of seperated pieces.Lastly every piece goes through a transform from centroid function to break up the mesh even further and create more interesting shapes.
Given that this was something I only made for me to use it filled the function I needed. However I would want to revisit this project when I have more time and make it more over all useful.Perhaps adding functionality such as a more customizable base mesh and control over the amount of fractures the mesh will have.
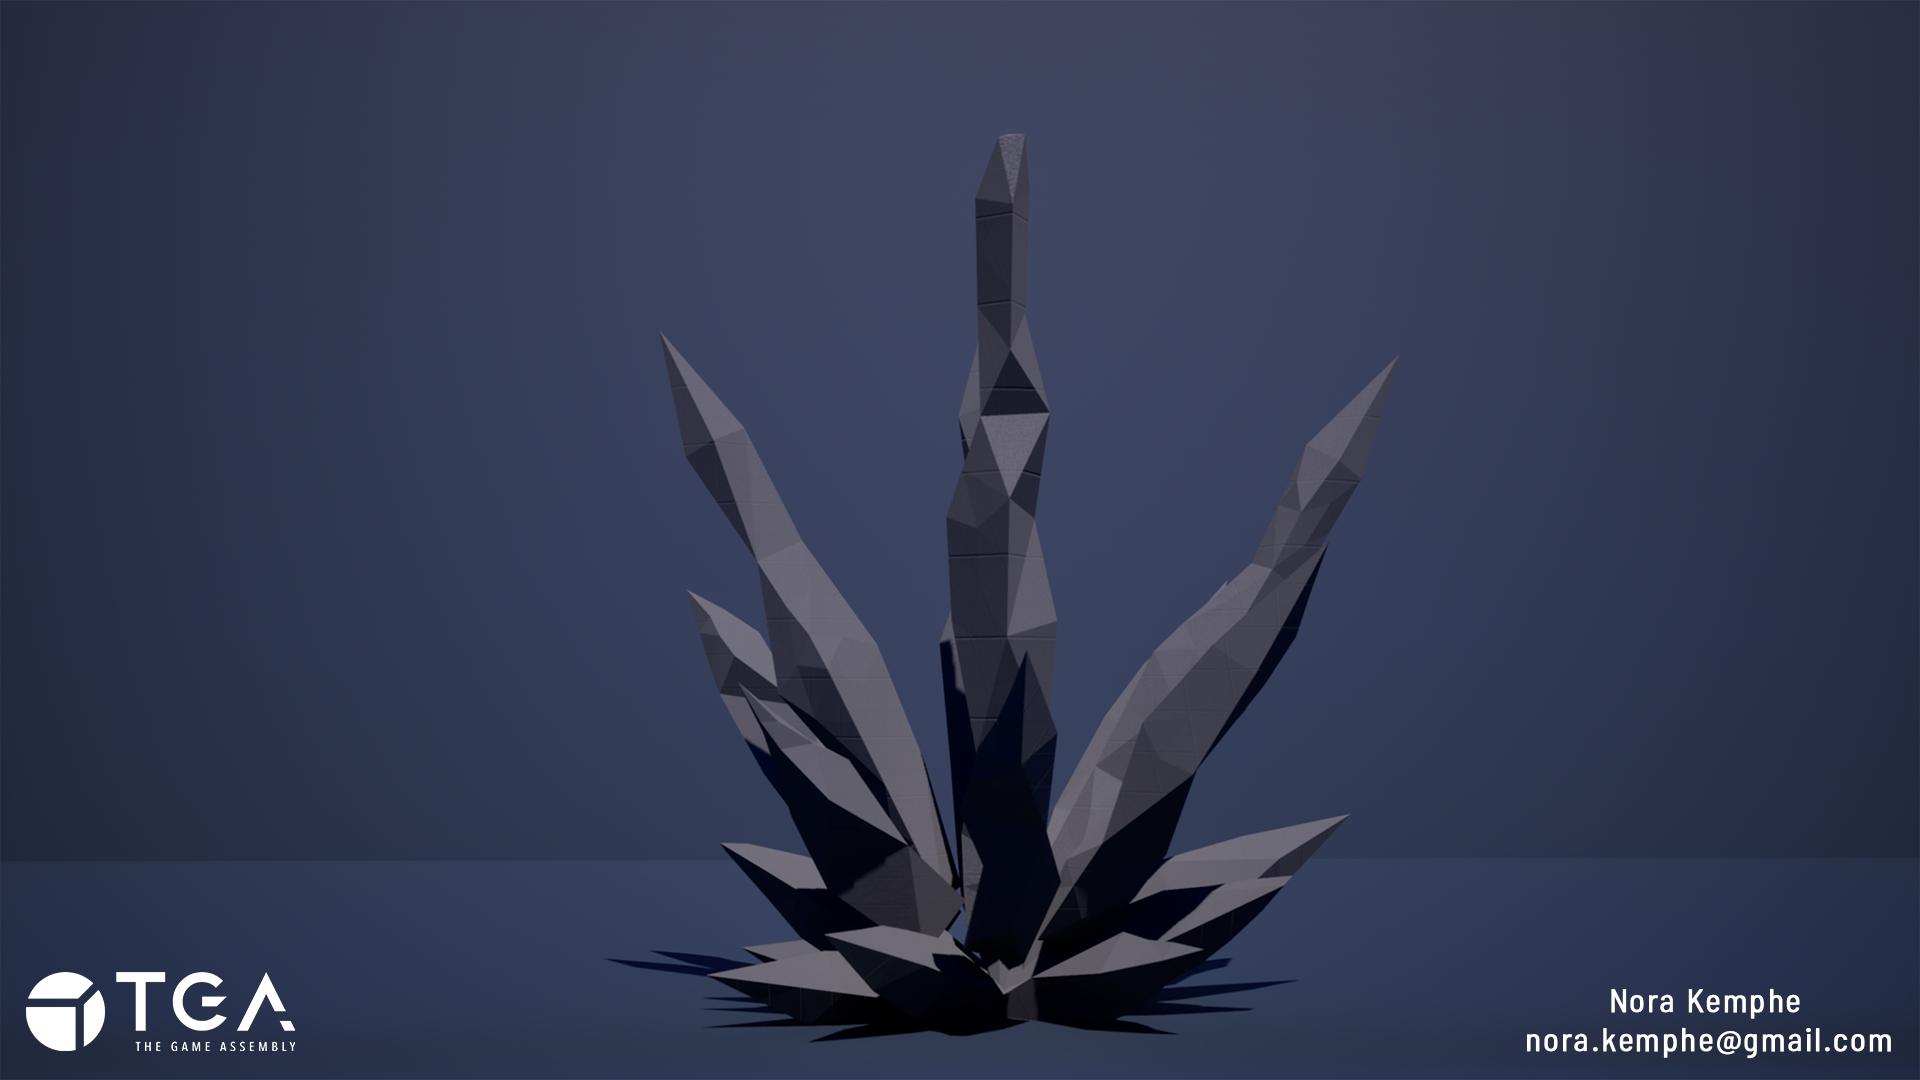
Moving on to creating the crystals, I used lines to map the placements of the crystals in a cluster and then turning them into meshes using the polywire node. This allowed me to early on visualize and edit the layout.
I then remapped the lines pscale to create tapering at the tip of the crystals. Doing that before the polywire and using the result of the pscale-remapping in the radius made each segment have that recognizable spiked look of a crystal.
To achieve a more random and broken up shape I remeshed the whole cluster making the larger faces more angular and interesting in nature.
Finally I needed to fix the UVs of the cluster. I ran the cluster through a for-loop going over each crystal individually. I then UV-mapped each segment using an attribute wrangle to get a more reasonable texel density in the final piece.
The smallest two crystals were then created using base shapes and cutting parts out to make their sides have more interesting placement.
For the taller pieces I used logic from the cluster to give them similar shapes. I followed the same steps of remapping the pscale to create a tapering on the top, this time only using one line for the single crystal instead of working with multiples.
I cut out pieces, changed the geometry to give more or less faces where needed and lastly UV-mapping the individual parts.
My goal was to create a type of evolution of these crystals, having them start very logical and sharp in the smallest versions but once they become larger and larger and begin to cluster they become more crooked and broken up in shape.

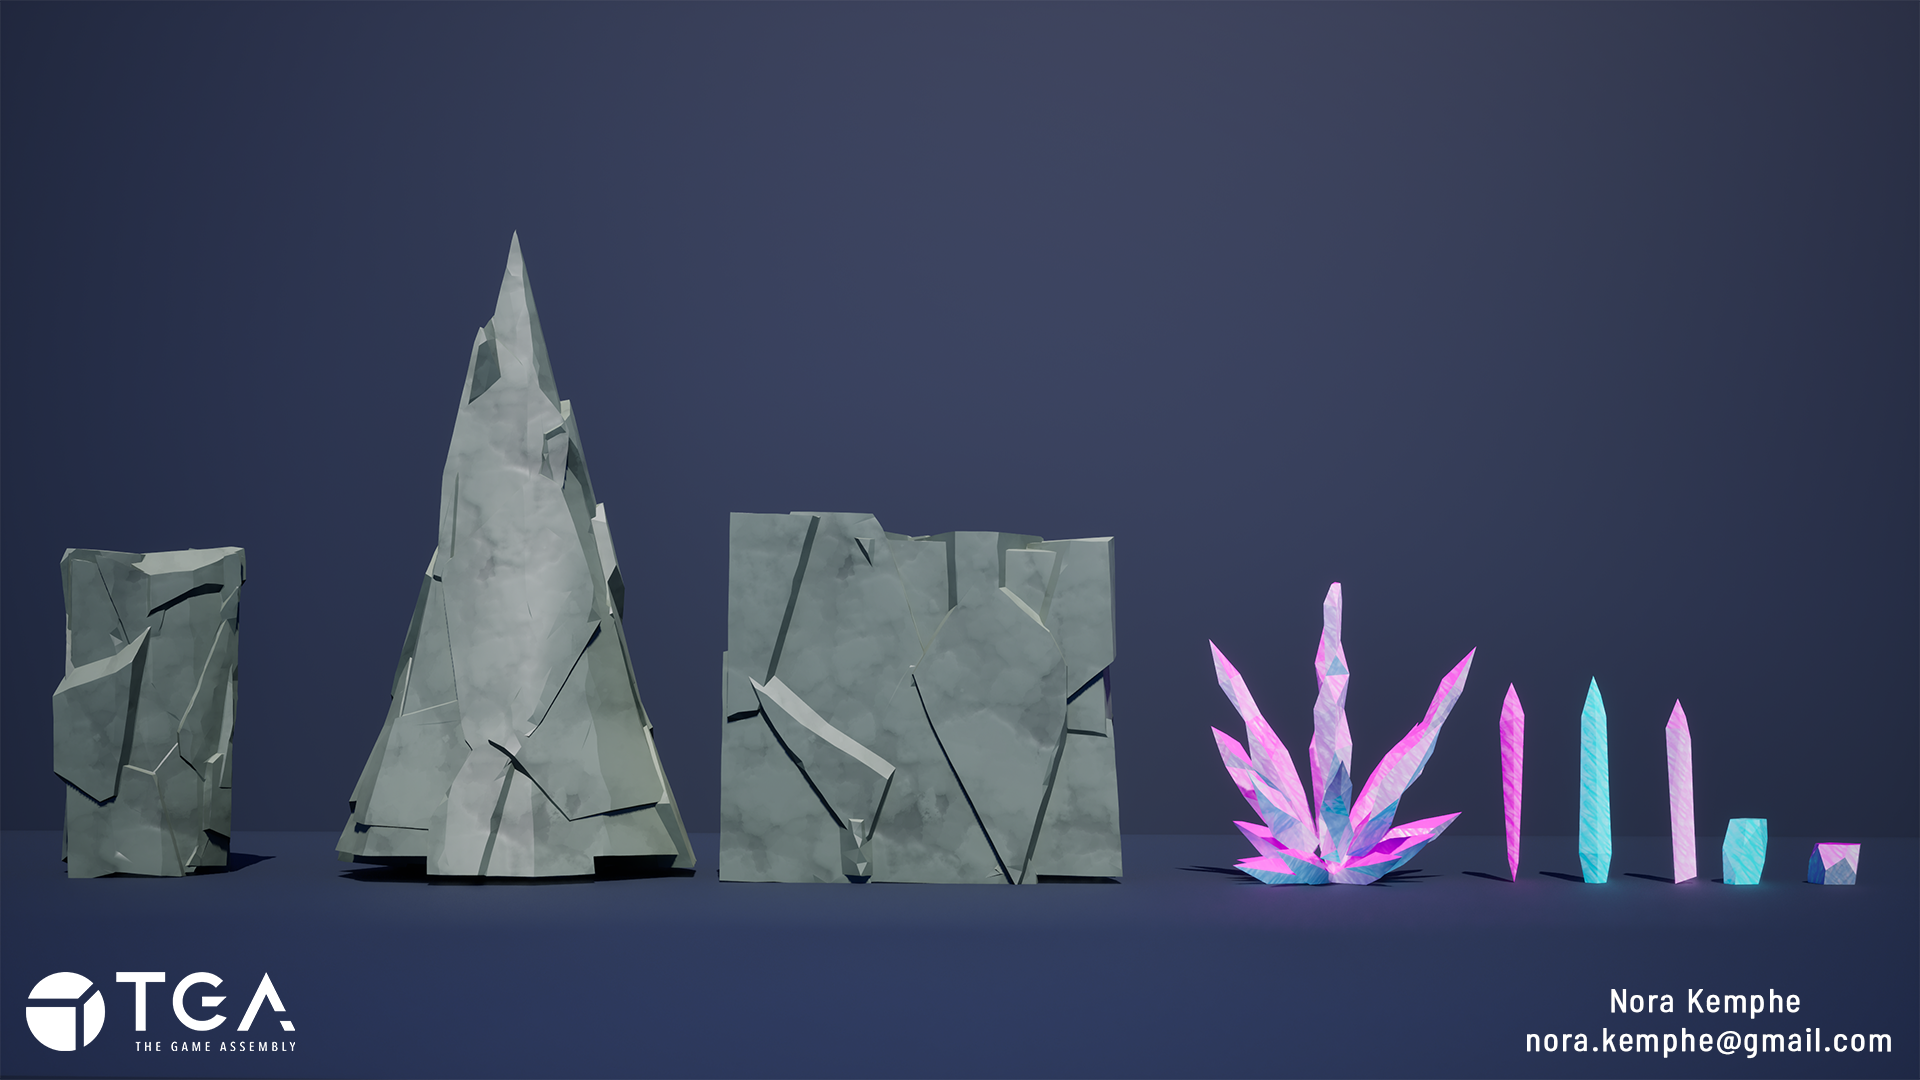
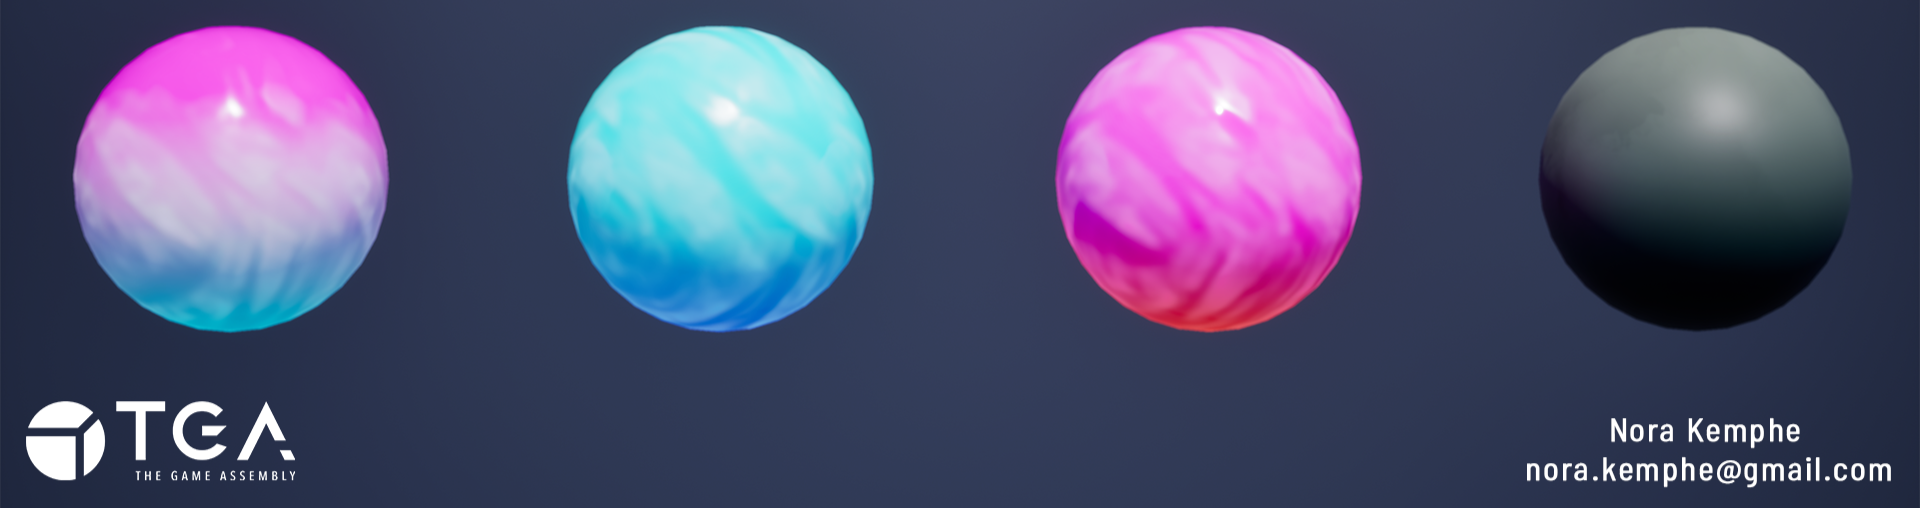
As stated before the material for the rocks is a world-tiling material. It also has a height-based coloring where you can control how much or little the tops of segments will have a lighter color.The crystals themself have a more magical looking material. I focused a lot on getting the feeling right in the material and using cartoony references to sell the concept further.
Problems and Solutions
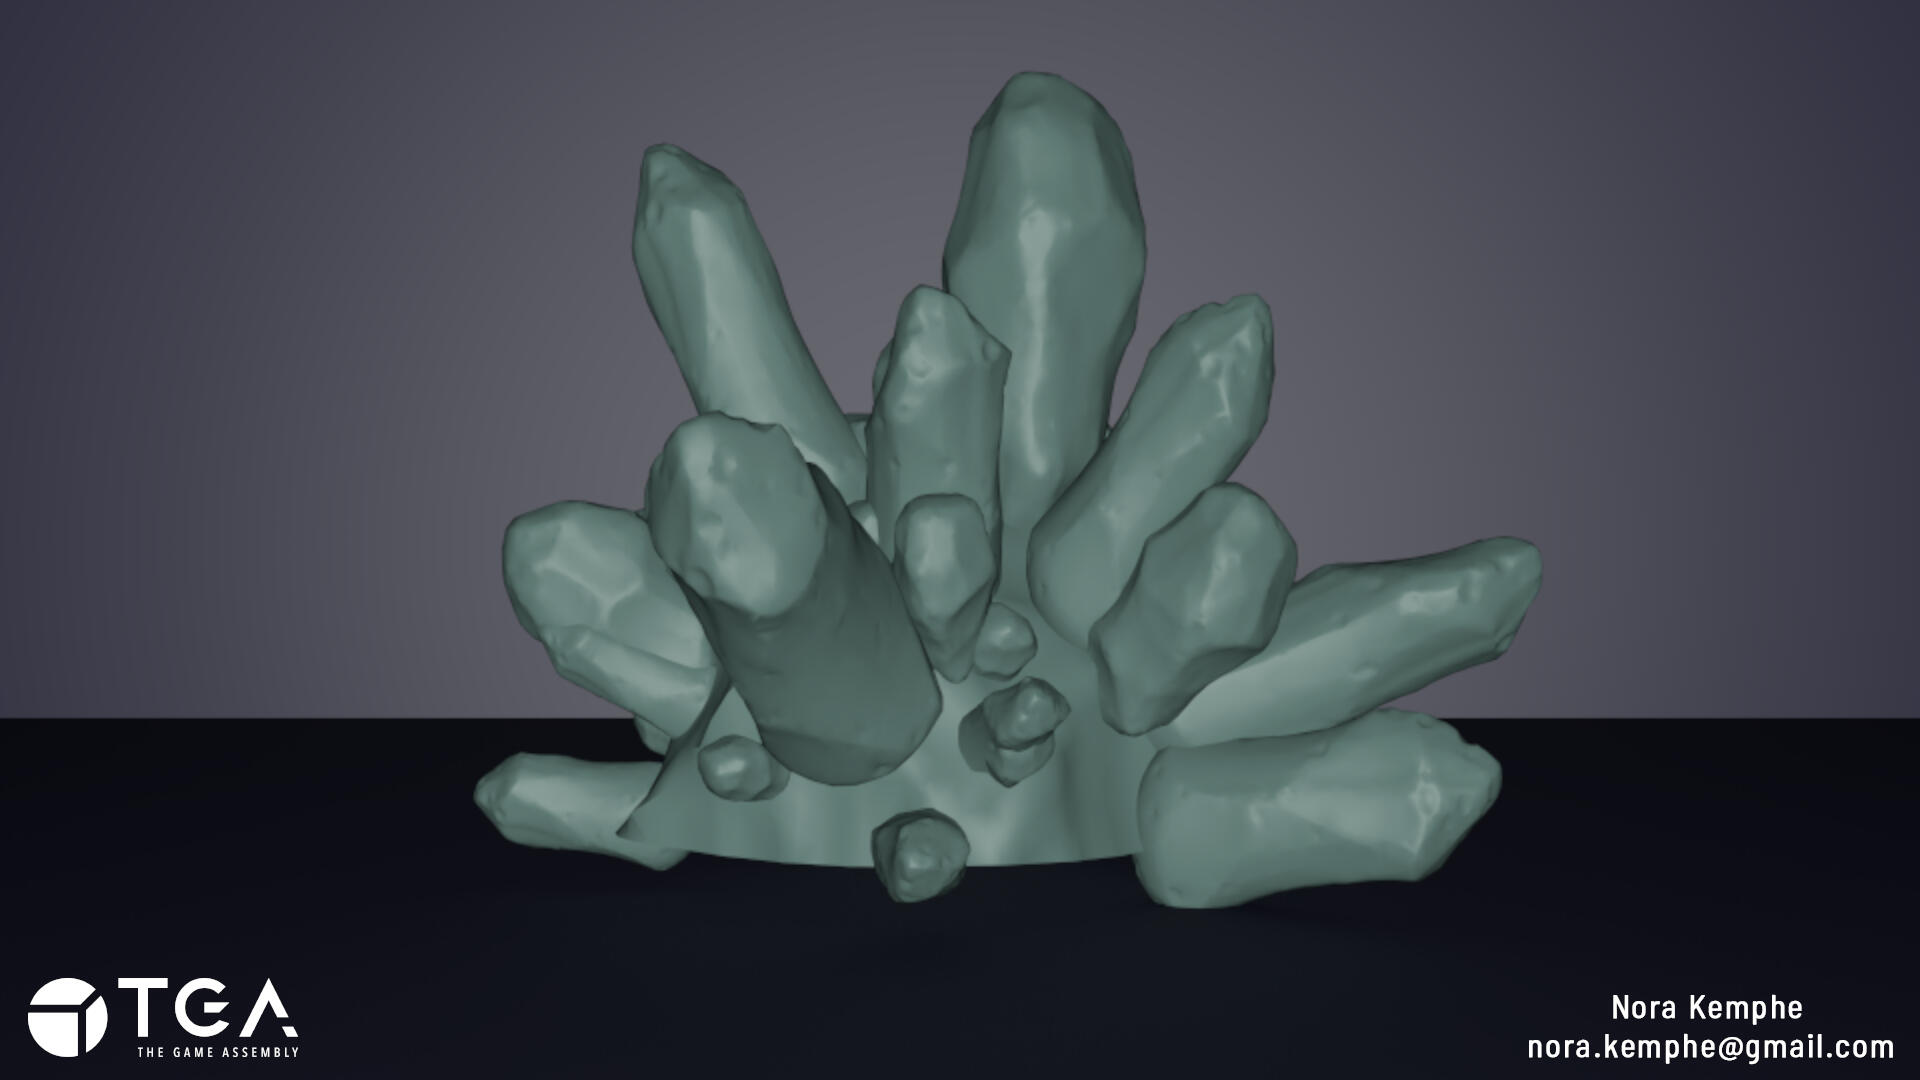
When working I found a lot of references and inspiration in other peoples projects and tried to work towards matching the look and feel of their results. This became a problem because in the end none of the references I was using were of real crystals making it hard to find ways to sell the look of a real crystal.
The result of this can be seen in the picture here to the right. It looks nothing like real crystals, each piece is too smooth, has too much small noise trying to replicate edge ware and they're placed very randomly looking rather unplanned.
The solution for my problems essentially meant to start over and try again. having learned my lesson I gathered pictures of real crystals for my references. I decided to keep a few of the old references I had used before, because I still wanted to have a more magical, game-like feel to the finished product, but made sure my main references were of real crystals.
In the end this helped me find that middle-ground I was looking for, something not quite real-world looking but undeniably looking like crystals regardless.
Important to note: I am part of The Game Assembly’s internship program. As per the agreement between the Games Industry and The Game Assembly, neither student nor company may be in contact with one another regarding internships before April 15th. Any internship offers can be made on April 27th, at the earliest.
LOOTBOX VFX

Purpose
The lootbox VFX project is an assignment at TGA where we get to study and experiment with communicating rewards to a player through visual effects.
Main goals for the assignment:- Have an interesting buildup,- Create a satisfying reward,- Utilizing context to enhance the effect.
For the scene I used assets and materials from the "Lowpoly Handpainted Environment" pack by Yevheniia Yaremko, avaliable through UE5 Fab.
Process
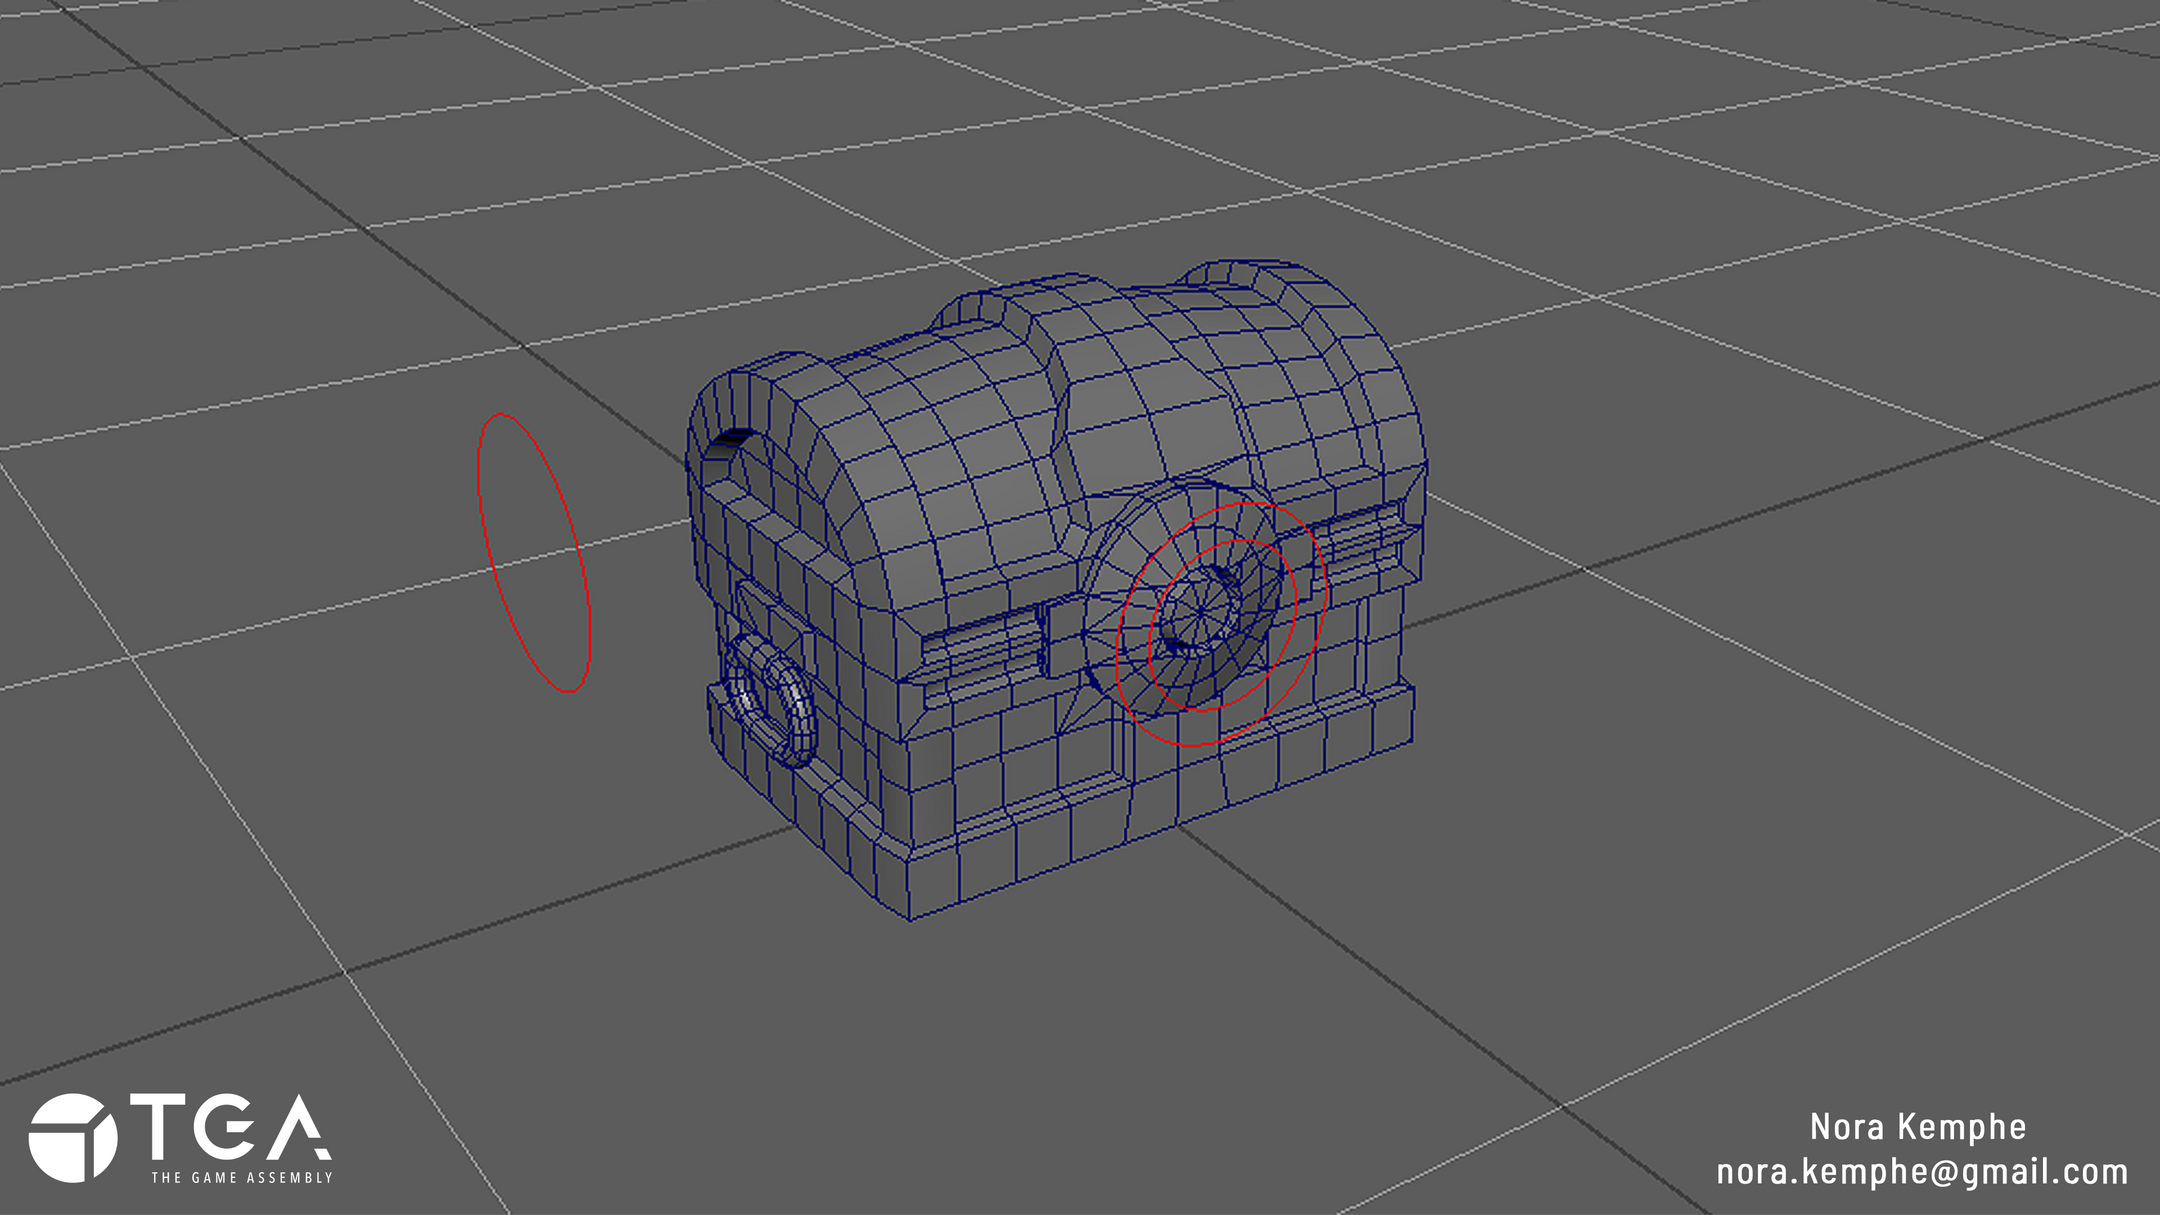
The process started with animating the pre-rigged chest in Autodesk Maya.
I created a new mesh in a cone-like shape in Blender and set up a tiling-texture for it in Unreal. This would be used for a magical aura eminating from the chest when opened.
I now started setting up the scene in Unreal using the asset pack by Yevheniia Yaremko. I did this early on to use the scene as a tone-setter for the effects and "magical vibe" of the lootbox.


The material for the chest had an emission map that I manipulated with panning textures and randomized colors to achieve the look of magic pulsating from the inside of the chest.
Finally, I used some animated, colored lights to add to the build-up and create more focus towards the opening chest.

Problems and Solutions
In the beginning of the project I did not know how the rig was set up for the chest and therefore it was quite hard to animate.I decided to take a break and just focus on understanding the rig. This took away from project-time but was necessary. This made me realize the importance of aptly naming each parts of a rig, to help the person that will use it.
Further into working on the project I ran into the problem of not feeling like the build-up was "good" enough. It didn't give a real sense of anticipation. Being short on time meant having to try multiple things, and quickly find one that worked.I landed on using animated lights to draw in the viewers eyes to the focal-point of the scene.Were I to have more time I would have tried more things and spent more time on each to really analyse the problem and the solutions avaliable.
Important to note: I am part of The Game Assembly’s internship program. As per the agreement between the Games Industry and The Game Assembly, neither student nor company may be in contact with one another regarding internships before April 15th. Any internship offers can be made on April 27th, at the earliest.